Product Design#
This section is about the product design of our embedded editor. The main goal was to create an intuitive and accessible application that seamlessly integrates into the TeachBooks ecosystem. To achieve this, we developed a WYSIWYG editor, heavily inspired by popular word processors like Google Docs and Microsoft Word. This approach lowers the technical barrier for content creators, allowing them to focus on the material rather than on markup syntax.
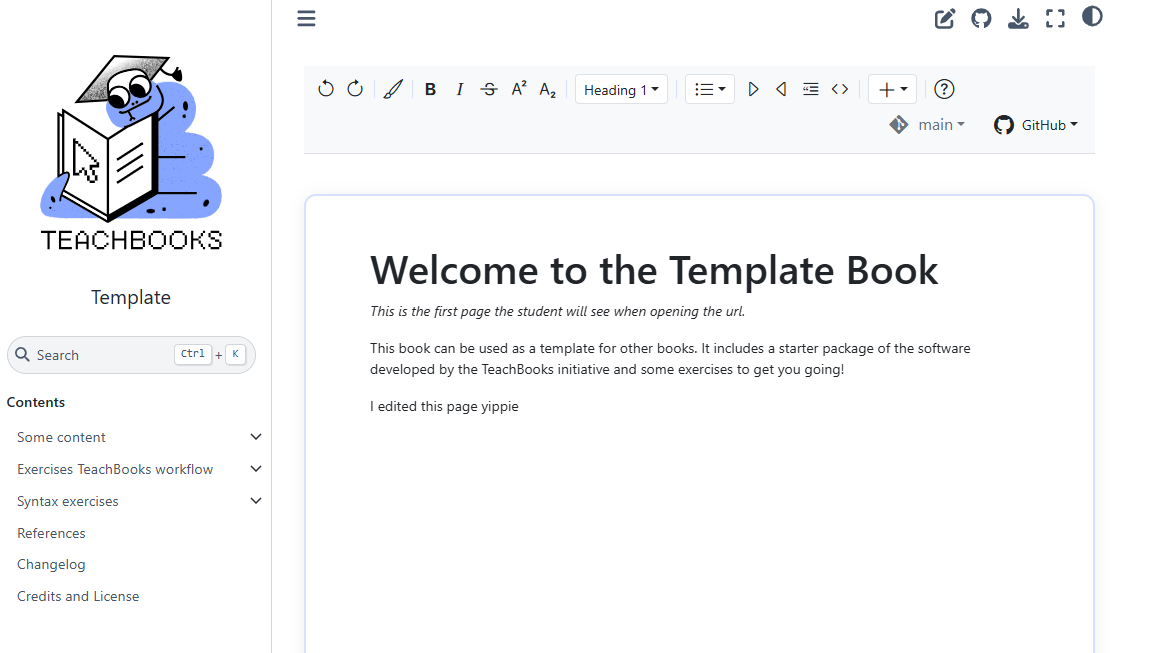
A key requirement was that the editor feel like a native component of the platform, not an external tool. Figure 5.1 shows a visual overview of the resulting interface, highlighting the clean layout and familiar, icon-driven toolbar. In the following subsections we discuss the three core design choices we made during the project:

Figure 5.1: The TeachBooks editor embedded into an actual book, showcasing the WYSIWYG editing area and the familiar, icon-driven toolbar designed for a great user experience.
WYSIWYG (What You See Is What You Get) Editor#
During the problem forming we, together with the client, made the choice to implement our solution as a WYSIWYG editor. While we made the decision early in the project, we still considered the alternatives and researched their shortcomings for our target audience of teachers and students, who may have limited technical knowledge. The most baisc alternive is the current TeachBooks workflow, editing the raw MyST syntax and only seeing the rendered version in the book when it’s completely built. This is not user friendly for our target audience at all. They would have to learn how to program before they can start making changes to their TeachBook.
A common other alternative is a side-by-side (or split-pane) editor. This type of editor displays raw MyST on one side and a rendered preview on the other. For people who are comfortable with the syntax this would be great solution. However, this approach still does not lower the entry barrier for users with little to no programming experience. So the core problem remains as the users still have to learn how to use the syntax before they can start making changes to their TeachBook.
So we went with the completely rendered WYSIWYG editor. Instead of requiring users to ‘program’ in Markdown, the editor allows direct manipulation of content as it will appear, simplifying formatting tasks like applying bold/italics, creating lists, and structuring headings. This approach significantly increases the accessibility of TeachBooks.
Familiar Toolbar#
The editor’s toolbar is heavily inspired by Google Docs and Word. Because of their enormous user base, almost everyone has experience in at least one of these editors. The icons for formatting options (bold, italic, lists, headings) are standard and easily recognizable. This familiarity aims to make users feel comfortable and productive from their first interaction, minimizing the need for documentation for basic operations (see Toolbar research).
Visual Consistency with TeachBooks#
A crucial aspect of the user interface design is keeping the same theme as the broader TeachBooks platform. The editor uses the same primary accent color, similar typography choices, and analogous styling for interactive elements like buttons and dropdown menus. This ensures that when users engage with the editor, it feels like a natural and integrated component of the TeachBooks suite, rather than a third-party tool .
A custom accent color (\#D7E1FF), based on the TeachBooks website, is applied to interactive elements like active buttons and dropdown selections. This provides clear visual feedback and gives the interface a cohesive look. Toggleable buttons reflect their state by changing background and text color, improving clarity during use.